AI Upscaled Textures

Show off your mod creations or just a work in progress.
Post Reply
User avatar
MasonFace
Posts: 543
Joined: Tue Nov 27, 2018 7:28 pm
Location: Tennessee, USA
Contact:

Re: AI Upscaled Textures

Post by MasonFace »

After roughly 6 hours of processing here are the masks http://s000.tinyupload.com/index.php?fi ... 5540987780
Thanks for the masks, Phredreeke! I've only tested it on a few frames, but it's lookin' good so far!

Also, nice results on the Blood upscale. I know ESRGAN tends to mess up the faces pretty bad. It would be great if someone would train an ESRGAN model on low resolution faces sometime. In the meanwhile, I suppose manual touch ups will just have to do...
I think we're again facing the problem of big features vs. small details here. The hand drawn low resolution sprites have a lot of very small features, and both ESRGAN and your scripts tend to distort them. It's probably something that cannot be alleviated altogether without hand-editing the sprites.
Agreed. This is especially true with targeting a 4x upscale; we can't easily hide a lack of detail behind chunky pixels. My plan was to upscale the NPC portraits (requires quite a bit of manual touch-ups, but even a non-artist like myself can do it) then fitting these faces onto the NPC flats similar to what I did here: viewtopic.php?f=14&t=1642&start=90#p19557

If we follow this path, then whatever method results in the best detail everywhere except the face would be the best bet, then we will manually clean up the faces later on. Another approach would be to keep the face generic looking -but still obviously a face- similar in quality to the woman in the top right frame of your results and let the player rely on the character portrait from the dialog to detail what that particular character looks like. If it requires manual touch ups to get it to that quality, then at least it will be fast and simple touch ups.
What's more, this raises the question of what exactly we're trying to achieve with the whole neural upscale enterprise.
Yeah, we should probably draft a mission statement and put it on the first post of the thread to help keep the overall vision in alignment. Speaking in platitudes here, but I believe everyone would be on board with the goal of trying to keep the upscaled graphic as close to parity with the original that it's replacing as possible. That isn't a very helpful statement since "as close to as possible" isn't quantifiable. Also lacking is the target resolution for upscaling.

I've been targeting 4x the vanilla resolution on MOBs and textures because it looks like we are able to produce enough detail to justify that resolution, particularly after compositing the AI results. I think if we follow the fore-mentioned techniques for the NPCs, they will work just fine at 4x, too. However, I haven't really turned much attention to NPCs yet since KoW's DREAM has artists who are doing good work upscaling them manually. I want to fill in the gaps of DREAM (particularly those xBRZ MOBs), then we can work on a stand alone alternative to DREAM that is as close to vanilla as it can be while still being enhanced. I've been referring to this alternate MOD as "Pure Vanilla Extract" (PVE). I think I will leave this thread open and start a new one specifically for PVE as we get more assets completed. We can attach the mission statement to that.
The consensus with the Doom upscale when it was discussed was that the end result should be of higher resolution but retain the "pixel art" quality.
I always thought it was odd that the neural upscale mod for Doom stopped at 2x resolution. Increasing the resolution and retaining the pixel art feel are goals that are diametrically opposed. I mean, when you're running the game at modern display resolutions and the textures can all be upscaled too, then what's the purpose of keeping anything low resolution? If you want the pixel art feel, then why not play the original? If you want an enhanced version, why not enhance it as much as possible? I honestly just assumed that HIDFAN upscaled to 4x or above, noticed that there were too many artifacts so he scaled it back down to hide the flaws.

phredreeke
Posts: 71
Joined: Mon Mar 11, 2019 9:13 am

Re: AI Upscaled Textures

Post by phredreeke »

Again, the consolidated archive you uploaded for me seem to start halfway through the game's assets (at 256_8-1) so you might want to send me the frames before that if you want me to process those as well.
MasonFace wrote: Mon Mar 18, 2019 8:48 pm I always thought it was odd that the neural upscale mod for Doom stopped at 2x resolution. Increasing the resolution and retaining the pixel art feel are goals that are diametrically opposed.
I have to disagree with you on that one. My goal with the Duke3D and now Blood upscales is to retain the aesthetic of the original sprites while at a higher resolution.

However, I'm lucky in that the sprites of Duke3D and especially Blood are larger than those of Doom and much of Daggerfall. I don't think my method produces particularly good results on the townsfolk for example.

User avatar
MasonFace
Posts: 543
Joined: Tue Nov 27, 2018 7:28 pm
Location: Tennessee, USA
Contact:

Re: AI Upscaled Textures

Post by MasonFace »

Oops! Sorry about that; not sure what happened there. This should be the rest: https://drive.google.com/open?id=1y8W-9 ... O_oc4X5-g5

phredreeke
Posts: 71
Joined: Mon Mar 11, 2019 9:13 am

Re: AI Upscaled Textures

Post by phredreeke »


User avatar
MasonFace
Posts: 543
Joined: Tue Nov 27, 2018 7:28 pm
Location: Tennessee, USA
Contact:

Re: AI Upscaled Textures

Post by MasonFace »

You're the man, Phredreeke! Thanks for processing those masks!
My goal with the Duke3D and now Blood upscales is to retain the aesthetic of the original sprites while at a higher resolution.
And I think you achieved your goal quite well. I agree that there is some intangible characteristic that gets lost in upscales, no matter how close to the original high definition artwork that it's derived from you get. Could just be nostalgia. Could be something else entirely. I dunno, but it does feel different. I just think if graphics can be upscaled reliably to higher resolutions, then higher resolutions should be targeted. If others prefer a more pixel art feel, it's easy to downscale it later on.

User avatar
MrFlibble
Posts: 411
Joined: Sat Jan 27, 2018 10:43 am

Re: AI Upscaled Textures

Post by MrFlibble »

MasonFace wrote: Mon Mar 18, 2019 8:48 pmSpeaking in platitudes here, but I believe everyone would be on board with the goal of trying to keep the upscaled graphic as close to parity with the original that it's replacing as possible. That isn't a very helpful statement since "as close to as possible" isn't quantifiable. Also lacking is the target resolution for upscaling.
I think this might not be even half the problem. It seems that any method of scaling pixel art up apart from nearest neighbour inevitably alters the image, somehow, that is is no longer the same. Just compare the townsfolk sprite upscale with xBRZ (which is fairly accurate to the original pixels all in all) to the original thing. The faces are clearly different although it's kind of hard to point out exactly what has changed. Apparently, as resolution increases we get a different magnitude of scale altogether which requires a different level of detail or something. In this respect, it is not immediately obvious to me how to increase resolution while preserving faithfulness to the source material.

I thought about your solution of using the high-res faces on the sprites but the obvious drawback is that the resulting image will be altered compared to its low-res counterpart in a decidedly non-trivial way.

Thankfully at least pre-rendered sprites are not affected as much by this.
MasonFace wrote: Mon Mar 18, 2019 8:48 pmI always thought it was odd that the neural upscale mod for Doom stopped at 2x resolution. Increasing the resolution and retaining the pixel art feel are goals that are diametrically opposed. I mean, when you're running the game at modern display resolutions and the textures can all be upscaled too, then what's the purpose of keeping anything low resolution? If you want the pixel art feel, then why not play the original? If you want an enhanced version, why not enhance it as much as possible? I honestly just assumed that HIDFAN upscaled to 4x or above, noticed that there were too many artifacts so he scaled it back down to hide the flaws.
The pixel art argument was one of the topics discussed, but hidfan also hinted that the sprites didn't look very good at higher resolutions:
Also, as the current 2X already have a distortion in artistic style caused by the AI algorythm, I fear it will be worse. (see test below 1x 2x 4x)
[source]
Back to Daggerfall NPCs, I did a few more tests with the higher resolution flats (innkeep, guards, royalty), and honestly I came to the conclusion that ESRGAN cannot properly handle faces at all. With this in mind, I deiced to fall back to the method I proposed earlier with blending xBR/xBRZ upscales with ESRGAN results.

I also did a closer comparison of the results using the different levels of Gaussian blur and concluded that anything above 1,5 pixel radius only makes the resulting image more blurry, which in case of blending with an xBR/xBRZ layer is not desirable. Additionally I switched back to the simple ESRGAN/Manga109 interpolated model at alpha = 0.5. It's sharper and also seems to more faithfully preserve the colours whereas the more Manga109 you have the more the colours are altered, as it seems.

For now I think I still like xBR more than xBRZ in terms of how it scales stuff up, precisely because xBZ (AFAIK) does some context-dependent pixel transformations while xBRZ doesn't (which is, somehow, advertised as its strength). Here's the result that for now seems the best out of what I've tried:
Image
This is a blend (G'MIC -> Layers -> Blend [median]; don't forget to select "All layers" on the left) of two input layers: (1) original image scaled up to 4x with xBR and (2) GIMP anti-aliased original image softened with xBR (see below) scaled up with ESRGAN/Manga109 interpolation at 0.5.

To get the second layer:
  • anti-aliase the original image with the built-in GIMP function (Enhance -> Antialiase)
  • scale the result up with xBR at 4x
  • open the scaled up image in GIMP again, apply Gaussian blur at 1.5 pixel radius, then scale back down using Bicubic interpolation
To get the mask, open the second layer in mtPaint, apply Kuwahara-Nagao blur at 1 pixel radius and with detail preservation. Convert the image to the original 8-bit palette and save. Open the result in GIMP Shift+O to select by colour and click on the background, then copy to the blended image.

For finishing touches, I also applied the Kuwahara-Nagao blur at the same settings to the blended image, then converted it to original palette too. I think there's no reason not to stick to the original palette even if it didn't help to get rid of the background.

phredreeke
Posts: 71
Joined: Mon Mar 11, 2019 9:13 am

Re: AI Upscaled Textures

Post by phredreeke »

How much of what you're describing can be batch processed though?

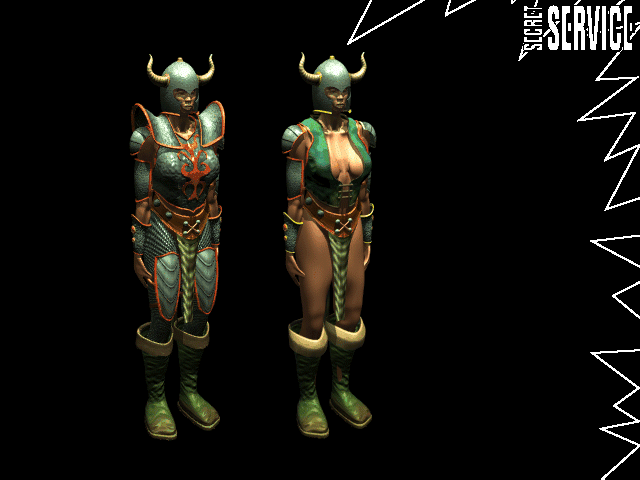
Out of curiousity, I decided to test the antialiasing filter in GIMP and compare it to my script.
antialiasingtest.png
antialiasingtest.png (5 KiB) Viewed 2771 times
First and second are my scripts at different intensities (this is only the first most rudimentary pass) and the third is GIMP's antialias function

All three have been upscaled 2x with smartsize after the fact and then had a threshold effect of 127 applied.

For comparison, this is my fully processed mask
tile1217t.png
tile1217t.png (2.36 KiB) Viewed 2771 times
Anyway, here is the first part of my script. Perhaps someone with enough knowledge of GIMP could make an equivalent script there. (unfortunately no comments because most of it was recorded in one go)

Code: Select all

    App.Do( Environment, 'LayerDuplicate', {
            'GeneralSettings': {
                'ExecutionMode': App.Constants.ExecutionMode.Default, 
                'AutoActionMode': App.Constants.AutoActionMode.Match
                }
            })

    App.Do( Environment, 'NewRasterLayer', {
            'General': {
                'Opacity': 100, 
                'Name': r'Raster 1', 
                'IsVisible': App.Constants.Boolean.true, 
                'IsTransparencyLocked': App.Constants.Boolean.false, 
                'LinkSet': 0, 
                'UseHighlight': App.Constants.Boolean.false, 
                'PaletteHighlightColor': (255,255,64), 
                'GroupLink': App.Constants.Boolean.true, 
                'BlendMode': App.Constants.BlendMode.Normal
                }, 
            'BlendRanges': {
                'BlendRangeGreen': (0,0,255,255,0,0,255,255), 
                'BlendRangeRed': (0,0,255,255,0,0,255,255), 
                'BlendRangeBlue': (0,0,255,255,0,0,255,255), 
                'BlendRangeGrey': (0,0,255,255,0,0,255,255)
                }, 
            'GeneralSettings': {
                'ExecutionMode': App.Constants.ExecutionMode.Default, 
                'AutoActionMode': App.Constants.AutoActionMode.Match
                }
            })

    App.Do( Environment, 'Fill', {
            'BlendMode': App.Constants.BlendMode.Normal, 
            'MatchMode': App.Constants.MatchMode.None, 
            'Material': {
                'Color': (255,255,255), 
                'Pattern': None, 
                'Gradient': None, 
                'Texture': None, 
                'Identity': r'Material'
                }, 
            'UseForground': App.Constants.Boolean.true, 
            'Opacity': 100, 
            'Point': (1,1), 
            'SampleMerged': App.Constants.Boolean.false, 
            'Tolerance': 0, 
            'GeneralSettings': {
                'ExecutionMode': App.Constants.ExecutionMode.Default, 
                'AutoActionMode': App.Constants.AutoActionMode.Match
                }
            })

    App.Do( Environment, 'SelectLayer', {
            'Path': (0,-1,[],App.Constants.Boolean.false), 
            'GeneralSettings': {
                'ExecutionMode': App.Constants.ExecutionMode.Silent, 
                'AutoActionMode': App.Constants.AutoActionMode.Default
                }
            })

    App.Do( Environment, 'LayerSetVisibility', {
            'Command': App.Constants.ShowCommands.Hide, 
            'Path': (0,1,[],App.Constants.Boolean.false), 
            'GeneralSettings': {
                'ExecutionMode': App.Constants.ExecutionMode.Silent, 
                'AutoActionMode': App.Constants.AutoActionMode.Default
                }
            })

    App.Do( Environment, 'SelectAll', {
            'GeneralSettings': {
                'ExecutionMode': App.Constants.ExecutionMode.Default, 
                'AutoActionMode': App.Constants.AutoActionMode.Match
                }
            })

    App.Do( Environment, 'SelectColorRange', {
            'Action': App.Constants.ColorRangeAction.Subtract, 
            'ReferenceColor': (0,0,0), 
            'Softness': 1, 
            'Tolerance': 0, 
            'GeneralSettings': {
                'ExecutionMode': App.Constants.ExecutionMode.Default, 
                'AutoActionMode': App.Constants.AutoActionMode.Match
                }
            })

    App.Do( Environment, 'ShapeBasedAntialias', {
            'AntialiasType': App.Constants.AntialiasType.Inside, 
            'GeneralSettings': {
                'ExecutionMode': App.Constants.ExecutionMode.Default, 
                'AutoActionMode': App.Constants.AutoActionMode.Match
                }
            })

    App.Do( Environment, 'SelectLayer', {
            'Path': (0,1,[],App.Constants.Boolean.false), 
            'GeneralSettings': {
                'ExecutionMode': App.Constants.ExecutionMode.Silent, 
                'AutoActionMode': App.Constants.AutoActionMode.Default
                }
            })

    App.Do( Environment, 'SelectPromote', {
            'KeepSelection': None, 
            'LayerName': None, 
            'GeneralSettings': {
                'ExecutionMode': App.Constants.ExecutionMode.Default, 
                'AutoActionMode': App.Constants.AutoActionMode.Match
                }
            })

    App.Do( Environment, 'SelectLayer', {
            'Path': (0,-2,[],App.Constants.Boolean.false), 
            'GeneralSettings': {
                'ExecutionMode': App.Constants.ExecutionMode.Silent, 
                'AutoActionMode': App.Constants.AutoActionMode.Default
                }
            })

    App.Do( Environment, 'SelectAll', {
            'GeneralSettings': {
                'ExecutionMode': App.Constants.ExecutionMode.Default, 
                'AutoActionMode': App.Constants.AutoActionMode.Match
                }
            })

    App.Do( Environment, 'SelectColorRange', {
            'Action': App.Constants.ColorRangeAction.Subtract, 
            'ReferenceColor': (0,0,0), 
            'Softness': 1, 
            'Tolerance': 0, 
            'GeneralSettings': {
                'ExecutionMode': App.Constants.ExecutionMode.Default, 
                'AutoActionMode': App.Constants.AutoActionMode.Match
                }
            })

    App.Do( Environment, 'ShapeBasedAntialias', {
            'AntialiasType': App.Constants.AntialiasType.Outside, 
            'GeneralSettings': {
                'ExecutionMode': App.Constants.ExecutionMode.Default, 
                'AutoActionMode': App.Constants.AutoActionMode.Match
                }
            })

    App.Do( Environment, 'SelectLayer', {
            'Path': (0,1,[],App.Constants.Boolean.false), 
            'GeneralSettings': {
                'ExecutionMode': App.Constants.ExecutionMode.Silent, 
                'AutoActionMode': App.Constants.AutoActionMode.Default
                }
            })

    App.Do( Environment, 'SelectPromote', {
            'KeepSelection': None, 
            'LayerName': None, 
            'GeneralSettings': {
                'ExecutionMode': App.Constants.ExecutionMode.Default, 
                'AutoActionMode': App.Constants.AutoActionMode.Match
                }
            })

    App.Do( Environment, 'SelectLayer', {
            'Path': (0,-1,[],App.Constants.Boolean.false), 
            'GeneralSettings': {
                'ExecutionMode': App.Constants.ExecutionMode.Silent, 
                'AutoActionMode': App.Constants.AutoActionMode.Default
                }
            })

    App.Do( Environment, 'NewRasterLayer', {
            'General': {
                'Opacity': 100, 
                'Name': r'Raster 2', 
                'IsVisible': App.Constants.Boolean.true, 
                'IsTransparencyLocked': App.Constants.Boolean.false, 
                'LinkSet': 0, 
                'UseHighlight': App.Constants.Boolean.false, 
                'PaletteHighlightColor': (255,255,64), 
                'GroupLink': App.Constants.Boolean.true, 
                'BlendMode': App.Constants.BlendMode.Normal
                }, 
            'BlendRanges': {
                'BlendRangeGreen': (0,0,255,255,0,0,255,255), 
                'BlendRangeRed': (0,0,255,255,0,0,255,255), 
                'BlendRangeBlue': (0,0,255,255,0,0,255,255), 
                'BlendRangeGrey': (0,0,255,255,0,0,255,255)
                }, 
            'GeneralSettings': {
                'ExecutionMode': App.Constants.ExecutionMode.Default, 
                'AutoActionMode': App.Constants.AutoActionMode.Match
                }
            })

    App.Do( Environment, 'SelectAll', {
            'GeneralSettings': {
                'ExecutionMode': App.Constants.ExecutionMode.Default, 
                'AutoActionMode': App.Constants.AutoActionMode.Match
                }
            })

    App.Do( Environment, 'Fill', {
            'BlendMode': App.Constants.BlendMode.Normal, 
            'MatchMode': App.Constants.MatchMode.None, 
            'Material': {
                'Color': (0,0,0), 
                'Pattern': None, 
                'Gradient': None, 
                'Texture': None, 
                'Identity': r'Material'
                }, 
            'UseForground': App.Constants.Boolean.false, 
            'Opacity': 100, 
            'Point': (1,1), 
            'SampleMerged': App.Constants.Boolean.false, 
            'Tolerance': 0, 
            'GeneralSettings': {
                'ExecutionMode': App.Constants.ExecutionMode.Default, 
                'AutoActionMode': App.Constants.AutoActionMode.Match
                }
            })

    App.Do( Environment, 'SelectLayer', {
            'Path': (0,1,[],App.Constants.Boolean.false), 
            'GeneralSettings': {
                'ExecutionMode': App.Constants.ExecutionMode.Silent, 
                'AutoActionMode': App.Constants.AutoActionMode.Default
                }
            })

    App.Do( Environment, 'LayerMergeDown', {
            'GeneralSettings': {
                'ExecutionMode': App.Constants.ExecutionMode.Default, 
                'AutoActionMode': App.Constants.AutoActionMode.Match
                }
            })

    App.Do( Environment, 'SelectLayer', {
            'Path': (0,1,[],App.Constants.Boolean.false), 
            'GeneralSettings': {
                'ExecutionMode': App.Constants.ExecutionMode.Silent, 
                'AutoActionMode': App.Constants.AutoActionMode.Default
                }
            })

    App.Do( Environment, 'LayerProperties', {
            'General': {
                'Opacity': None, 
                'Name': None, 
                'IsVisible': None, 
                'IsTransparencyLocked': None, 
                'LinkSet': None, 
                'UseHighlight': None, 
                'PaletteHighlightColor': None, 
                'GroupLink': None, 
                'BlendMode': App.Constants.BlendMode.Difference
                }, 
            'BlendRanges': None, 
            'Path': (0,0,[],App.Constants.Boolean.false), 
            'BrightnessContrast': None, 
            'ChannelMixer': None, 
            'ColorBalance': None, 
            'CurveParams': None, 
            'HSL': None, 
            'Threshold': None, 
            'Levels': None, 
            'Posterize': None, 
            'Overlay': None, 
            'GeneralSettings': {
                'ExecutionMode': App.Constants.ExecutionMode.Silent, 
                'AutoActionMode': App.Constants.AutoActionMode.Default
                }
            })

    App.Do( Environment, 'LayerMergeDown', {
            'GeneralSettings': {
                'ExecutionMode': App.Constants.ExecutionMode.Default, 
                'AutoActionMode': App.Constants.AutoActionMode.Match
                }
            })

    App.Do( Environment, 'SelectLayer', {
            'Path': (0,-1,[],App.Constants.Boolean.false), 
            'GeneralSettings': {
                'ExecutionMode': App.Constants.ExecutionMode.Silent, 
                'AutoActionMode': App.Constants.AutoActionMode.Default
                }
            })

    App.Do( Environment, 'DeleteLayer', {
            'Path': None, 
            'MergeMask': App.Constants.Boolean.true, 
            'GeneralSettings': {
                'ExecutionMode': App.Constants.ExecutionMode.Default, 
                'AutoActionMode': App.Constants.AutoActionMode.Match
                }
            })

    App.Do( Environment, 'LayerDuplicate', {
            'GeneralSettings': {
                'ExecutionMode': App.Constants.ExecutionMode.Default, 
                'AutoActionMode': App.Constants.AutoActionMode.Match
                }
            })

    App.Do( Environment, 'Soften', {
            'GeneralSettings': {
                'ExecutionMode': App.Constants.ExecutionMode.Default, 
                'AutoActionMode': App.Constants.AutoActionMode.Match
                }
            })

    App.Do( Environment, 'MaskFromImage', {
            'CreateMaskFrom': App.Constants.CreateMaskFrom.Luminance, 
            'InvertMaskData': App.Constants.Boolean.false, 
            'SourceImage': 0, 
            'GeneralSettings': {
                'ExecutionMode': App.Constants.ExecutionMode.Default, 
                'AutoActionMode': App.Constants.AutoActionMode.Match
                }
            })

    App.Do( Environment, 'SelectLayer', {
            'Path': (1,1,[],App.Constants.Boolean.false), 
            'GeneralSettings': {
                'ExecutionMode': App.Constants.ExecutionMode.Silent, 
                'AutoActionMode': App.Constants.AutoActionMode.Default
                }
            })

    App.Do( Environment, 'DeleteLayer', {
            'Path': None, 
            'MergeMask': App.Constants.Boolean.true, 
            'GeneralSettings': {
                'ExecutionMode': App.Constants.ExecutionMode.Default, 
                'AutoActionMode': App.Constants.AutoActionMode.Match
                }
            })

    App.Do( Environment, 'LayerMergeDown', {
            'GeneralSettings': {
                'ExecutionMode': App.Constants.ExecutionMode.Default, 
                'AutoActionMode': App.Constants.AutoActionMode.Match
                }
            })

User avatar
MasonFace
Posts: 543
Joined: Tue Nov 27, 2018 7:28 pm
Location: Tennessee, USA
Contact:

Re: AI Upscaled Textures

Post by MasonFace »

Back to Daggerfall NPCs, I did a few more tests with the higher resolution flats (innkeep, guards, royalty), and honestly I came to the conclusion that ESRGAN cannot properly handle faces at all. With this in mind, I deiced to fall back to the method I proposed earlier with blending xBR/xBRZ upscales with ESRGAN results.
I think these turned out really quite well! And it illustrates the frustration of working with the disjointed artwork of Daggerfall; a method that works great for prerendered MOBs doesn't necessarily upscale hand drawn NPCs as well. There just isn't a magic bullet for this kind of stuff. I think your results here did a good job keeping the hand drawn aesthetic, even if some of the outlines are a little off.
I think there's no reason not to stick to the original palette even if it didn't help to get rid of the background.
That's a hard sentence to parse out. If you're saying that you'd prefer to lower the color depth to match the vanilla DF palette, then I respectfully disagree. Maybe you believe this helps preserve the aesthetic? I'm not going to say you're wrong- but we should probably all have an earnest discussion going back to what exactly we're trying to achieve with the whole neural upscale enterprise.

[begin opinionated rant]

Feel free to object, but I believe that we should be striving to restore the graphics to the quality of the original source artwork that Bethesda used to create the assets - before downscaling the resolution and reducing the color depth to save memory. The obvious problem here is that we have very little to go by. I mean, I sure haven't seen any of the original artwork, so we'd really just be guessing what the ideal upscale should match.

On the other hand, others seem to be anchored to the graphics that was shipped with the game and consider that to be the "source material." I think the consequence of this is that the "pixeliness" and palette gets conflated with the art style.

I prefer to target what I believe the artists would have wanted the game to look like if the technical limitations of their time were lifted. But of course, I am not one of the original artists so how can I be sure precisely what that would look like? I think the best we could do in this regard is to try to reach a consensus on what we believe the original Bethesda assets looked like and target that. One benefit to this that I've mentioned before is that if others want more pixeliness and vanilla color palette, it would be very easy to downscale resolution and color depth from our results.

[/end opinion]
Anyway, here is the first part of my script. Perhaps someone with enough knowledge of GIMP could make an equivalent script there.
I've been writing GIMP scripts for the last few weeks, sooooo I'm kind of an expert. :ugeek: (I'm being facetious, of course!)
I may look through and see if I can replicate it in GIMP, but I have to admit that it looks pretty unfamiliar. Was this script written by hand or is this something like a recorded macro?

User avatar
jayhova
Posts: 924
Joined: Wed Jul 19, 2017 7:54 pm
Contact:

Re: AI Upscaled Textures

Post by jayhova »

MasonFace wrote: Tue Mar 19, 2019 7:42 pm [begin opinionated rant]

Feel free to object, but I believe that we should be striving to restore the graphics to the quality of the original source artwork that Bethesda used to create the assets - before downscaling the resolution and reducing the color depth to save memory. The obvious problem here is that we have very little to go by. I mean, I sure haven't seen any of the original artwork, so we'd really just be guessing what the ideal upscale should match.

On the other hand, others seem to be anchored to the graphics that was shipped with the game and consider that to be the "source material." I think the consequence of this is that the "pixeliness" and palette gets conflated with the art style.

I prefer to target what I believe the artists would have wanted the game to look like if the technical limitations of their time were lifted. But of course, I am not one of the original artists so how can I be sure precisely what that would look like? I think the best we could do in this regard is to try to reach a consensus on what we believe the original Bethesda assets looked like and target that. One benefit to this that I've mentioned before is that if others want more pixeliness and vanilla color palette, it would be very easy to downscale resolution and color depth from our results.

[/end opinion]
I feel exactly this way. No one thinks wouldn't it be great if I had to made everything in my game flat and low resolution. Bethesda was limited to what they could do with the hardware of the day. They of course would have prefered better artwork and models etc. But they had no choice.

This retro esthetic is a very modern thing. I certainly did not think 'hey wouldn't it be great if in 20 years the graphics of this game were just as crappy as now?'.
Remember always 'What would Julian Do?'.

User avatar
MrFlibble
Posts: 411
Joined: Sat Jan 27, 2018 10:43 am

Re: AI Upscaled Textures

Post by MrFlibble »

MasonFace wrote: Tue Mar 19, 2019 7:42 pm I believe that we should be striving to restore the graphics to the quality of the original source artwork that Bethesda used to create the assets - before downscaling the resolution and reducing the color depth to save memory. The obvious problem here is that we have very little to go by. I mean, I sure haven't seen any of the original artwork, so we'd really just be guessing what the ideal upscale should match.
I would agree with that, generally, but there are two problems here:

1) Obviously some assets were created at a low resolution from scratch. This includes the small hand-drawn NPC sprites I gave a go at scaling up above. Apparently, these are a leftover from the phase where sprites were more similar to those in Arena, both in resolution and art style.

In all honesty, I don't know how to handle them, as I stated in my previous post. Even if we somehow have Mark Jones redraw them at a higher resolution, the result will not be the same sprites, but high-resolution artwork made with the small originals as the artist's reference. It is my understanding that KoW's project is moving in this direction, and I welcome this, but again it means producing high-resolution images that are not the same as the source material.

We have proof that some later, higher-res hand-drawn NPC flats were scaled down and touched up, because there's a set of unused high-resolution counterparts to existing sprites in the game files. At this moment I cannot tell if these unused high-res images are the source material or not (i.e. there were some even higher resolution images originally). I tried to scale up a few of these and ESRGAN does not do a particularly good job with them.

2) Now onto the pre-rendered sprites which are the most promising venue with neural upscaling. Even if you scale them up with the most simple waifu2x method you'll notice one thing: the models are rather underdetailed. The hands have no separate fingers, no toes if barefoot, the faces are very basic if visible at all etc. This is corroborated by Mark Jones' personal account:
Bare in mind that all the human-like figures that you see here are based on a model I made after only two weeks of using Alias. They were later refined for Battlespire, I gave them fingers and better proportioned bodeies, but I always felt that I should just find the time to redo them completly. Unfortunately on Daggerfall the schedule only allowed at Maximum 2 days for a character, including modelling, animating, rendering, and finally getting the graphics into a format that the programmers could use.
The problem here, at least as it seems to me, is that the low-detailed models worked rather well when they were transformed into low-resolution sprites, but as you increase the resolution (and the tools we currently have at our disposal allow to do that rather well) these deficiencies become more and more apparent.

Of course the upscaled sprites could probably then be edited to enhance detail (although this might require a lot of effort on the part of the artist) but this again, just as with the redrawn sprites I mentioned above, will be derivative work, not a simple enhancement of the originals.

I'm trying to figure out if there's some middle ground here, I mean increase the resolution and properly scale up the sprites yet keep the deficiencies out of the way without adding much of your own editing, but so far I cannot say that I came up with a satisfying solution even in theory (as in simply stating what qualities such art should possess), even less so a practical implementation.
MasonFace wrote: Tue Mar 19, 2019 7:42 pm I prefer to target what I believe the artists would have wanted the game to look like if the technical limitations of their time were lifted. But of course, I am not one of the original artists so how can I be sure precisely what that would look like?
Well, we have the account of Mark Jones from his site (sadly only this old version is available, I cannot access his current website). I believe that there is sufficient evidence (including the quotation above) that given proper time and resources, he'd create art that would look like his Battlespire work, including the unused female human warrior. But there's no way to create that from the low-res Daggerfall sprites alone.

There's also some Daggerfall concept art available that was published back in the day. Could be used as a source for a "Daggerfall as Bethesda intended to do" project (which I think would be an awesome project to have all in all).

To sum up, I believe that at this point we have the question still open, and I'll welcome further discussion. I'd also like to stress that I'm not defending my previous statement about the 8-bit palette, but it seems to me a reasonable method to use at least to accomplish some of the goals.

Post Reply